Pages

Wednesday, December 9, 2009

EIGRP, backup and default gateway


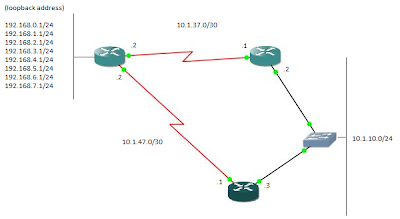
EIGRP configuration


go to cyb n png, type this command on both router

Cyb(config)#router eigrp 1

Cyb(config-router)#network 10.0.0.0

Cyb(config-router)#no auto-summary

# router eigrp 1 : You can choose any number for eigrp from 1-65535, router with the same eigrp AS number will exchange routing information each others.

# network 10.0.0.0 : all the interface with this address will be advertised to all router with eigrp 1

#no auto-summary : if you are using classless IP address in your network, this command should be apply, if not, router gonna summarize all the network and only advertise it as a single network. It may cause looping problem. Classfull network not gonna effected

After eigrp is set on the 2nd router, you’ll notice there’s a message as picture above, this mean that both router are learning each other, they both advertise the network 10.x.x.x as defined in the command.

Type #show ip eigrp interface to know which interface is advertise, in this case, all the interface with address 10.x.x.x


Now we’ll configure eigrp on Aus router, but this time one by one, mean I’ll do on specific interface or subnet. Previously we did it by take the full class of 10.x.x.x IP address. We gonna start advertise subnet 10.1.37.x to eigrp 1, follow by other subnet.

Aus(config)#router eigrp 1

Aus(config-router)#network 10.1.37.0 0.0.0.255


The message show only 10.1.37.x subnet as new learned network, this example just to show how to choose any specific subnet to advertise. So now we’ll proceed to add the rest of the subnet.

Aus(config-router)#network 10.1.47.0 0.0.0.255

Aus(config-router)#network 192.168.0.0 0.0.255.255

So we added all the network that we want eigrp to learn already, now let’s check from Cyb router, type

Cyb#show ip route


from the result, we can see there are two directly connected subnet (line start with c, d is eigrp). Ok, now we know that cyb already learn about 192.168.x.x network that connected to Aus.

Simulate the backup link when the primary is down

From the topology, there are two links from Aus to reach 10.1.10.0/24, and vice versa. Let’s assume Aus – Cyb is 2xT1 line, Aus – Png is T1. How to this? Just manually set the interface bandwidth.

Aus(config)#int ser 0/0 (to Cyb)

Aus(config-if)#bandwidth 3088 (format is in kilobits)

Aus(config)#int ser 0/1 (to Png)

Aus(config-if)#bandwidth 1544 (format is in kilobits)

Type show ip route


But there’s only one route to 10.1.10.x, what happen to Aus-Png? Actually eigrp only advertise the best route. Show ip route only show routing table, so to see all the learned network table(topology table), type show ip eigrp topology

There’s a lot of information we can get from here. In red,

FD is feasible distance; cost between here(Aus) – 10.1.10.x.

AD is advertise distance; cost from neighbor to 10.1.10.x; Cyb to 10.1.10.x

codes p – passive mean the routing for this route is in idle because the link is up.

Codes A – active mean not ok; the link maybe down or not avaible, so routing protocol is actively looking for a backup or another link to this network

if you notice, AD for both router to 10.1.10.x is same, this is because both are having the same cost(bandwidth) to reach 10.1.10.x, fd is not same because the WAN link not same, Cyb use 2xT1 and Png use T1. So eigrp will choose the lowest FD as successor(primary link).

Ok, now let’s shutdown the successor, int ser 0/0 on Aus, and show ip route

Now route to 10.1.10.x is thru Png, 10.1.47.1

Default route (usually for internet)

Now let’s simulate a default route or route to the internet, let’s assume link to the internet is using loopback 0, 192.168.0.0/24 on Aus.

Aus(config)#ip route 0.0.0.0 0.0.0.0 lo 0 //this will route ‘any’ address to’ any’ address thru loopback 0

Aus(config)#router eigrp 1

Aus(config-router)#net 0.0.0.0 //advertise ‘any’ network to eigrp 1

To try this, try traceroute to 4.2.2.2, one of the internet DNS from any router(just for example) better try from Cyb or Png to make sure eigrp advertise this route to all the router within the same AS number


All the packet to the destination unknown or any or (internet) will be routed to 10.1.47.2 which is Aus. So this should be enough to prove the concept J happy routing!

set proxy for terminal ubuntu


1.Open terminal, type "sudo gedit /etc/bash.bashrc"


2.At the end of the line, type "export "http_proxy=http:proxy_ip:port_number""


Saturday, November 21, 2009

IPsec, and IPsec over GRE Tunnel

Intro

Most of enterprise today move to IPsec over GRE tunnel to save cost, but I'm not saying that this technology already rule out MPLS, lease line, etc. It depend on that site, how critical it is, how stable the internet connection is. Usually small office like sales that only have few workers use this to connect to corporate LAN.

IPsec and GRE Tunnel is 2 different thing, we'll go with IPsec first, then brief about GRE then I'll give you an example of IPsec over GRE tunnel


IPsec

The three main point of IPsec is

Authentication
Data Integrity
Confidentiality

Authentication
to make sure you communicating or talking to the right person

Data Integrity
to make sure what you sending is received at the destination with the same shape, mean no modification happen along the way

confidentiality
to make sure what send not able to be seen by third party

What build an IPsec ?

Basically, IPsec is a combo of a few protocol

Negotiation : IKE
Security : AH, ESP, ESP+AH
Encryption : DES. 3DES, AES
Authentication : MDS, SHA

Protection : DH, DH2, DH5, DH7


2 Mode of communication

Transport Mode
This mode is used when data need to be secure within the LAN, maybe super important and high confidentiality kind of data


from the picture above, the encryption/protection only apply to layer 4 and above, this is because this packet only travel within the LAN, so there's no point to protect the ip packet.
Secure communication happen between two point, other party can't read the packet from layer4 and above only, they still can read the IP layer.


Tunnel Mode
This mode is used when packet need to travel across a public network, where it's dangerous to let other to see the private/internal IP information
In this mode, encryption is done starting from IP header(layer3) and above to protect the internal IP information, new public IP header then will be added so this packet can be routed in public network.

The two type of encryption keys
Symmetric : each use same key to encrypt and decrypt data (shared key)
Asymmetric : public key to encrypt, private key to decrypt


Data Integrity

Data integrity is to make sure data is-untouched along the way to the destination. To make sure this, first data will be calculated using a formula to produce a value, then it'll be hashed and send ed. When received in the other site, it'll be re-calculated again, if the value is same as value that produced before, it's mean that the data is clean from any modification.


The 2 phase to make communication happen

IKE phase 1


From example above, R1 want to initiate a connection, so R1 gonna with sending message 1


Message 1 : negotiate a matching IKE SA policy between peer to protect IKE exchange
Message 2 : exchange DH key
Mesagge 3 : Make sure they are who they are (authentication)

Basically this phase is to setup a secure management channel for IKE phase 2


IKE phase 2

Negotiate and exchange IPSec Parameter protecting by existing existing IKE SA
Periodically renegotiate IPsec SAs to ensure security
Data transfer also happen in this stage

Example : Step by step how to configure a secure IPsec
1. Setup ISAKMP policy (IKE Phase 1), the management phase
png(config)#crypto isakmp policy 50 // give policy number, the lower the higher priority
png(config-isakmp)#authentication pre-share // pre-share, both site much share the same key
png(config-isakmp)#encryption des
png(config-isakmp)#group 2 // select group for DH key to use
png(config-isakmp)#hash sha

png(config)#crypto isakmp key cisco123 add 71.209.254.34 // define the pre-share key here, set address for the peer

2. Setup IPsec transform set (IKE Phase 2), basically this is where we define the set of encryption and hash for the data to use
png(config)#crypto ipsec transform-set CISCO_SET esp-des esp-sha-hmac

3. Define interesting traffic using access-list command, here is where where we define which subnet or address that need to be forwarded to the IPsec channel
png(config)#ip access-list extended INT_TRAFFIC
png(config-ext-nacl)#permit ip 172.3.0.0 0.0.255.255 192.168.1.0 0.0.255.255


4. Setup crypto map
png(config)#crypto map VPN_MAP 10 ipsec-isakmp // give a name to the map
png(config-crypto-map)#set peer 71.209.254.34 // set the it's peer
png(config-crypto-map)#match add INT_TRAFFIC //set interest traffic
png(config-crypto-map)#set transform-set CISCO_SET //set transform group


5. Apply to the interface
png(config)#int fa 0/1
png(config-if)#crypto map VPN_MAP


First Post

I work for a giant microprocessor company as a network engineer.
Our network infrastructure are very complex, but the problem is my knowledge and experience are not that complex (I'm a fresh grad). so i must do something about this, and i decided to start blogging about network technologies and set a target; to become a CCIE certified !! well, this is where i coming from, and see you on next post ;-)